
Showing posts with label Sauce. Show all posts

Monday, November 16, 2015

Coconut Flour Pancakes with Coconut, Maple & Chocolate Sauce

Disclaimer: This is a sponsored post. Winston received the "Colour Basics Coupe Dinner Set" as a gift from Maxwell & Williams.


Recently, I was approached by Maxwell & Williams and asked whether or not I'd be interested in doing some food styling for them to promote their range for the Spring season. If you have been following my blog the past few months, you would've noticed that this blog has taken a slight change in direction. The food review aspect has taken quite a backseat and this blog has become more focused on home cooking and food styling. I get asked quite often as to why this is so. 

To be honest, the real reason is that I'm just too lazy to take my camera out to restaurants anymore. And even if I do, the photos might not be up to scratch for me and I am really hesitant about posting photos from my iPhone like I used to. That said, I do intend on making a comeback to food reviewing one day because there's always so many places that I've experienced, truly enjoyed and really wish I could share about. 

After doing this for over 4 years now, I can surely say that the experience of blogging is honestly nothing short of a journey for me now as it has since the day I started. Constantly evolving, hopefully growing; and the landscape of this blog really is a reflection of who I am as a blogger. There are changes in my subject, focus, photography and even writing. I like trying new things and challenging myself creatively along the way. To me, this is what makes blogging so exciting. 


Right now, I am really passionate about food styling ever since my food photography workshop in April. I love looking at interesting food photos and I am constantly in awe by the creativity behind each of those photos. I feel so inspired to push myself to step out of my comfort zone and be more adventurous in food photography too. It is for that reason why I was actually really looking forward on taking up this opportunity and collaborating with Maxwell & Williams.

Speaking of stepping outside your comfort zone, I was initially quite worried as soon as I opened the package (if I'm being honest). I mean, it was really blue. Something I'm not used to. I wasn't sure how I'd get to showcase and highlight food on a plate as striking as this. What colour tones do I want in the food or overall picture? What colour or texture do I want for the surface or the backdrop? What do I even make? After much thought, I decided to just embrace the colour and all its vibrance head on. I wanted to make something with lots of colours on the plate it so that the blue wouldn't stand out as much. Also, I wanted to highlight the colour yellow and make it a big component of the dish as I thought that yellow looks pretty good against blue. Pancakes it was. I decided to go with a neutral surface to help accentuate the colours on the plate too. 

Finally, I wanted to get some soft shadows in the shot to soothe the overall picture as I was worried that all the colours might be too loud and confronting. After many, many attempts, I think I finally got what I was trying to achieve out of these pictures. I must say that I really enjoy this dinner set now. The size, shape and colours actually work really well and I enjoy using them very much. Am thankful for this gift set from Maxwell & Williams.


Okay and as for this recipe, I really wanted to make something healthy-ish because I'm still on my diet. The result was an accidental vegetarian and gluten free recipe (gasp). This coming from Mr Carnivore over here. Anyway, the pancakes were actually really light and fluffy and the dessert was very well received overall when I made it for some friends on the weekend. They definitely dug this healthier alternative and so did I. Little positive steps go a long way, I say. Plus, this recipe is so easy to make.

I highly recommend you give these pancakes a go. Definitely a keeper of a recipe, if you ask me.


Coconut Flour Pancakes with Coconut, Maple & Chocolate Sauce

(pancakes adapted from this recipe by Nourishing Days)


Ingredients

Coconut pancakes:
4 eggs
1 cup light coconut milk
2 tsp vanilla extract
1 tbsp honey or real maple syrup
1/2 cup coconut flour
1 tsp baking powder
1 tsp cream of tartar
1/2 tsp salt
Coconut oil *

* I use coconut oil spray as I find it more convenient to cook with

Chocolate sauce:
4 tbsp coconut oil
50g dark chocolate
2 tbsp real maple syrup
1 tsp vanilla essence
Pinch of salt

To serve:
Fresh berries (I used raspberries and blackberries)
Fresh figs (sliced to quarters)
Slivered almonds

Method

1. Heat a non stick pan on low-medium heat. In a small bowl, beat the eggs until frothy. Mix in the coconut milk, vanilla and honey or maple syrup.

2. In a medium-sized bowl, mix the coconut flour, baking powder, cream of tartar and salt until well combined. Form a well in the middle of the bowl. Slowly pour in the wet mixture while mixing slowly until well combined. 

3. Spray the pan with coconut oil spray or add a small knob of coconut oil. Ladle a few tablespoons of batter into the pan. Spread out into a circle (of approx. 4 inches in diameter) with the back of the spoon. Once the pancake forms bubbles on the surface (approx 1 - 2 minutes), flip to cook for a further minute or so. Cooking times may vary and practice makes perfect. I didn't get the hang of it until my 3rd or 4th pancake. 

4. Remove pancake and set aside on a plate. Repeat process with remaining batter until all pancakes are cooked. Give the pan a quick spray or small knob of coconut oil each time before adding the batter. 

5. For the chocolate sauce, combine all ingredients in a glass bowl and place in microwave in 30 second bursts until chocolate is all melted. 

6. To serve, pour chocolate sauce over pancakes and garnish with berries, figs and almonds.


Monday, July 6, 2015

Roasted Grape Sauce Recipe


So a few months ago, I had the most AMAZING weekend away in Daylesford when I attended a food photography workshop hosted by the ever amazing Ewen Bell and Iron Chef Shellie. I have long been a fan of Ewen's photos on Instagram and Shellie is without a doubt the most talented food blogger I know. Could not help but feel absolutely inspired the whole weekend. Best time.


#dattart !!!

Oh and suffice to say, a LOT of good food was had that weekend including this ABSO-FRICKIN-LUTELY DELICIOUS Roasted Grape, Goat's Cheese & Parmesan Crust Tart. Wow... Just WOW. Such an incredible creation by Shellie and I cannot wait to bake it myself soon because I miss it so much. 


Anyway, I learned from Ewen and Shellie that roasting grapes is one of the most clever cooking idea I've come across in a long time. Having grapes on their own can be one dimensional because all you can taste is sweetness. But once roasted, it sort of reduces and replaces some of the sweetness with a much deeper, earthy flavour. And suddenly, these grapes actually go really well with savoury dishes. Too good. The flesh also has a soft, mushy centre which I enjoy. Plus, I just think that the blistered look of the grape skin is just so stunning.

Ewen was the one that suggesting roasting the grapes because it goes really well with roast pork and he was so right. Similar to having apple sauce with pork but roasted grapes are so much more interesting. It was seriously delicious and I highly recommend it too so please give this one a go. Trust me, you won't regret it.

I also highly recommend my Easy Roast Pork with Crackling recipe: HERE. Total crowd pleaser and 100% success rate by me and anyone who's tried it!


Have I mentioned how much I love brussel sprouts too?


Roasted Grape Sauce Recipe

(inspired by Iron Chef Shellie and Ewen Bell)

Click here to print the recipe

Ingredients

1 vine of red grapes (seedless)

Method

1. Preheat the oven to 200°C. Place the grapes on a single layer on a metal plate/tray and roast for 15 - 20 minutes or until the grapes look blistered.

2. Remove from the oven and allow to cool for 10 minutes. Crush all the grapes with a fork and knife to squeeze out the juices. Mix together and set aside until ready for use. Best served warm with roast pork!


The most incredible Sunday roast dinner! There was:
- Roasted grape sauce
- Crispy brussel sprouts in coconut oil and chilli
- Roasted garlic and mushroom mashed potato

Sunday, June 21, 2015

Seared Venison with Braised Red Cabbage, Pancetta Crisps & Red Wine Jus


Hello!

I can't help but feel compelled to begin each blog post these days with an apology for the lack of updates. Most nights I'd try to sit in front of the laptop to write up new post but often just  end up giving in because of how tired I felt at the time. I'm quite the social media fanatic so would be great if you got connected with me on my Instagram (@winceeee) and Facebook page (The Hungry Excavator) too!

It's such a lame and overused excuse but work really has been quite busy for me. I guess in many ways I feel like I've reached a milestone in my career sooner than I expected and it's definitely kept my plate full but at the same time, fuelled me to want to keep going even further/harder. It's because of the pressing nature of my work that makes me so grateful to have a blog or blogging related activities to look forward to after I clock off to unwind. Anyway, I've got lots of recipes lined up in my backlog that I can't wait to share with you guys so please stay tuned.

Righto, back to the recipe. A friend of mine went hunting one weekend and managed to shoot two deers that time. I haven't been hunting myself but I do know that deers are not easy to hunt at all. Most of the time, people would come back empty handed so for him to have shot not one, but two deers was very impressive.

I was definitely happy for my friend because it was his first time successfully hunting one down but if I'm being honest, I was even happier about the fact that he shared them with me too! I feel very grateful when people think of me and specifically share their food with me (maybe because I think people know that I always appreciate it). I heart people!

As soon as I got these beautiful venison backstraps, I flipped through an old cookbook I got from a good friend a few years ago for my 21st in search of some inspiration. Came across a couple in there that looked really good so decided to combine and modify them a bit to suit my liking. The final result was very delicious. I don't normally cook many recipes like these but it's actually quite simple and at the end of the day, it's always great to try something different in the kitchen. Every element actually worked and enhanced the other so I am definitely a fan of this combination. 

This plate of food was definitely delicious to eat and actually very simple to make. There's lots of things you could substitute the venison backstrap for if you haven't got it available. I think veal or lamb backstraps would work beautifully too or even liver instead of meat too! Something that's lean or quick to sear.

Hope you give this a go and that you have a fantastic week ahead!


So difficult to not sneak a piece... Or five as soon as they came out of the oven (!!)


Seared Venison with Braised Red Cabbage, Pancetta Crisps & Red Wine Jus

(recipe adapted from the cookbook "Must Eat" by Russell Blaikie)

Click here to print the recipe

Ingredients

For the braised cabbage:
1/4 red cabbage
4 tbsp olive oil
3 cloves garlic (minced)
1 brown onion (chopped finely)
150ml red wine vinegar
150g sugar
Cracked salt and pepper

For the red wine jus:
125ml red wine
50ml port wine
1 litre beef stock
50g unsalted butter
Cracked salt and pepper

Other:
200g venison backstrap (cut to thin strips) *
12 slices pancetta
Olive oil
Fresh sage leaves
Cracked salt and pepper
60g unsalted butter

* may be substituted with veal, lamb or even liver instead of backstrap

Method

For the braised cabbage:
1. Remove the core of the cabbage and slice it finely. Heat up the oil in a pot. Add the garlic and onions and cook until soft and fragrant. 

2. Add the vinegar and sugar, stirring until the sugar is dissolved. Add in the cabbage and place the lid on to simmer on low heat for 25 - 30 minutes (or until cabbage is tender), stirring occasionally.

3. Season with cracked salt and pepper and cook with the lid off for a further 15 minutes or until most of the liquid has evaporated. Set aside until ready for use. Can be stored in refrigerator for 3 to 4 days.

For the red wine jus:
1. Pour the red wine and port into a saucepan and reduce on high heat until about 60ml or quarter of a cup liquid left.

2. Add the beef stock and boil on high heat (and skimming regularly) until the sauce has reduced to about three quarters of the volume left. Stock should be a little thick, viscous and glossy.

3. Remove from the heat and stir in the butter until well combined. Season with cracked salt and pepper to taste.

For the remainder of the dish:
1. Preheat the oven to 200°C. Line the pancetta slices on a wire rack and bake in the oven for 8 - 10 minutes or until  the pancetta is golden brown and crisp. Remove and allow to cool to room temperature on the wire rack. Refrain with every ounce of your being from nibbling away on these lip smackingly good pancetta crisps. 

2. Heat a little olive oil in a pan until hot and add in the fresh sage leaves to cook for about 10 - 15 seconds or until crisp. Remove and drain excess oil on kitchen towel.

3. Season the venison/veal/lamb backstrap on both sides with cracked salt and pepper. Heat the pan with a little more olive oil until hot. Place the backstrap into the pan and sear or cook for about 30 seconds per side (depending on thickness of cut). The meat should still have a little blood still when slicing into it (you don't want it overcooked).

4. Add the butter into the pan and allow it to foam and brown slightly. Coat the backstraps in the butter and remove from heat.

5. To serve, place the braised red cabbage on a plate and the seared meat on top. Scatter with crisp sage leaves and top with pancetta crisps. Drizzle some red wine jus around the plate. Enjoy.


Tuesday, March 25, 2014

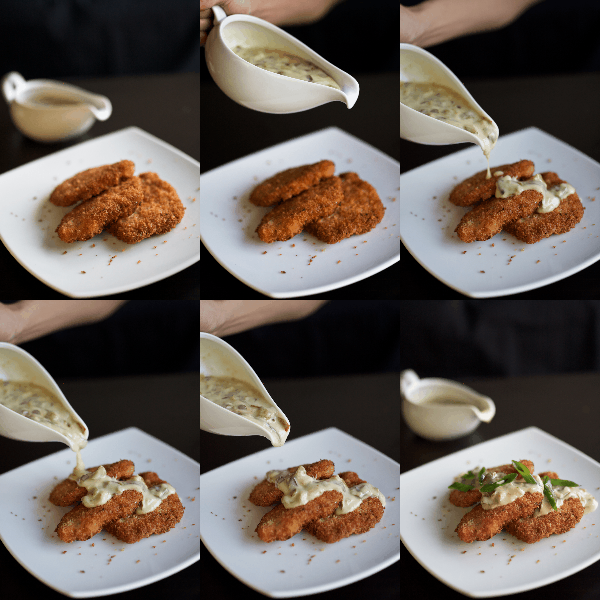
Crumbed Pork Cutlets with Creamy Jalapeno & Green Onion Sauce


In case you haven't noticed by now, I am currently on a mini mission to blog all the recipes and reviews that I've got sitting in the backlog for the longest time. All these posts only take up just as much space in the computer as it does the back of my mind. I do hope to get through them, one at a time. I find that my palate has definitely changed a lot as of late so I'd really like the food adventures I share on this blog to be more current and relevant to my life today.

As most of you may know from my Instagram photos, 2013 was really the year of "potlucks" for me. Attending/hosting potlucks left, right and centre. This was a dish I made when I had a potluck one Saturday evening at my place with over 30 of my friends. How I managed to fit everyone in my place is still a mystery.

The cutlets stayed crisp for a really long time until my guests arrive and was enjoyed by all. I decided to make this recipe at the time as I wanted an excuse to buy a meat mallet. Now, I am quite the schnitzel or crumbed cutlet fanatic. The sauce is so easy and tasty too.

Oh, and I know that it's 2014 now and I'm probably 10 years behind, but I've finally made my first GIF! It's like how I only started playing Counter Strike 2 years ago after it's been out for about 10 years? You can tell that I am very much ahead of the times... 

Anyway, hope you enjoy this recipe as much as I did.


Crumbed Pork Cutlets with Creamy Jalapeno & Green Onion Sauce

(slightly adapted from this recipe by Food Wishes)

Ingredients:

For the pork cutlets:
1kg pork tenderloin (trimmed and cut to 8 equal sized pieces)
Salt and pepper
1/4 cup plain flour
2 eggs (beaten)
3 cups panko breadcrumbs 
Oil for frying

For the sauce:
2 tbsp butter
1/3 cup dill pickles (diced)
1 large jalapeno pepper (diced and deseeded)
1 cup green or spring onions (sliced)
1 1/2 tbsp plain flour
1 1/2 cups cold milk
1 tsp Worcestershire sauce
Cayenne pepper
Salt and pepper

Method:

For the pork cutlets:
1. Place a layer of cling wrap at the top and bottom of each piece of pork. Using a meat mallet, pound or flatten the pork until it is just under 1cm thick. Repeat until all the pork is done.

2. Season both sides of the pork with salt and pepper and lightly coat each cutlet with plain flour in a large plate/tray. 

3. Stir in the beaten egg into the plate/tray and coat the cutlets in egg evenly.

4. Place the panko breadcrumbs in a separate plate and coat each cutlet evenly with the breadcrumbs. Set aside on a large plate. Repeat until all cutlets are coated. Leave in fridge for 20 minutes.

5. Heat up a large pan with 3 to 4 tablespoons of oil. Once hot, fry the cutlets in batches until golden brown on both sides. Should take 4 to 5 minutes per side. Once cooked, set aside.

Tip: You can cook the cutlets hours ahead before your guests arrive. Just place the cutlets on a wire rack in an oven at 60°C to keep warm. Just before serving, crank up the oven to 180°C for 5 minutes to heat up again.


For the sauce:
1. Heat up a pan with the butter. Once butter is melted, stir in the pickles, japanelo and green onions and cook until the onions are softened.

2. Mix in the plain flour. Once the flour is combined, stir in the cold milk and allow to simmer on low for about 5 minutes or until the sauce is thickened.

3. Add in the Worcestershire sauce and a few dashes of cayenne pepper. Season the sauce with salt and pepper to taste. 


4. When ready to serve, place the cutlets on a plate and drizzle with sauce on top. Garnish with more sliced green onions on top. Eat immediately.


Sunday, September 1, 2013

Kaki Fry (Deep Fried Panko Oysters) and Chawanmushi Recipe


These babies were too hard to resist!

Besides making the Tempura Soft Shell Crabs for the Japanese potluck I had at my place a few weeks back, I also made these delicious Kaki Fry (Deep Fried Panko Oysters) and Chawanmushi (Japanese Steamed Egg Custard) too. 

Kaki Fry is one of my favourite things to order at Japanese restaurants. When it's good, it's REALLY good. I must say that I've been scorned by many horrendous ones in the past with thick/cakey batter and stinky oysters. Although, my love (and stubbornness) for them has always gotten the better of me and I end up ordering them time and time again. As is the case for Tempura Soft Shell Crabs. Hence, the reason for finally making them at home. 

These Kaki Fry in particular were great and turned out better than expected. Huge hit at the party. Making the Japanese Tartare sauce is extra work but worth the effort. If you're pushed for time, serving them with Kewpie Jap Mayo is great as well.


Potluck spread. Well done, all!


As for the Chawanmushi, they turned out really good too. Everyone has their preferences, but I think a good Chawanmushi is smooth in texture, so thin that it almost melts in your mouth with a good dashi stock base and lots of ingredients inside. 

Happy to say that this was all of that and much easier to make at home than expected! I go even further to say that they're better than the ones you get in many Japanese restaurants.


Dashi, a generic term used for "stock" in Japanese cooking is typically made with dried kelp and bonito flakes. Sometimes, with dried anchovies too. The dashi powder I used was delicious and I recommend it for your cooking.


Besides that, I also recommend having a small bottle of the S&B Assorted Chilli Pepper Powder in your pantry for Japanese cooking. Such a great ingredient to have handy, love it.

BIG thanks to Cooking With a Dog for sharing their recipes on Youtube. Definitely my go to source for great, authentic Japanese homecooking. Fail proof recipes every time!


__________________________________________


Kaki Fry (Deep Fried Panko Oysters) Recipe
(adapted from this video recipe by Cooking With a Dog)

Ingredients:

For the oysters:
1 dozen fresh oysters
1 cup water + 1 tsp salt
1 egg
4 tbsp plain flour
2 tbsp water
1/2 cup plain flour
1 1/2 cups panko breadcrumbs
Oil for frying

For the Japanese tartare sauce:
1 hard boiled egg
2 tbsp onions (finely minced)
2 tbsp parsley (finely minced)
1 small pickled cucumbers (or 2 small cornichons, finely diced)
2 tbsp mayonaise 
2 tbsp lemon juice
pinch of salt

To garnish:
Chopped spring onions 
S&B Chilli Pepper Powder (optional)

Method:

1. Rinse each oyster thoroughly in the salted water. Pat them dry with a paper towel and set aside. Rinse and pat dry the oyster shells too for serving later.

2. Mix all the ingredients for the Japanese tartare sauce in a bowl and set aside. 

3. For the batter, mix the egg, 4 tbsp plain flour and water in a bowl until well combined. 

4. Coat each oyster lightly in remaining flour. Cover the oysters in batter and coat thoroughly with panko breadcrumbs. Place all the breaded oysters in the fridge for at least 20 minutes.

5. Heat up oil in a pot. Once very hot, remove the oysters from the fridge and fry them on both sides in oil until golden brown. Remove and allow to cook on wire rack.

6. To serve, place each of the fried oysters in a shell. Top with small dollop of Japanese tartare sauce (or Kewpie Mayo). Garnish with spring onions and a dash of S&B Assorted Chilli Pepper. 


Chawanmushi (Japanese Steamed Egg Custard) Recipe
(adapted from this video recipe by Cooking With a Dog)

Ingredients:

For the fillings:
1 skinless chicken thigh fillet 
6 shrimps (shelled and deveined)
4 frozen crab sticks (sliced)
6 fresh shiitake mushrooms (halved)
Cooking sake and soy sauce for seasoning

For egg custard:
3 large eggs 
2 1/2 cups water
1 sachet (5g) dashi stock powder
1 1/2 tsp cooking Sake
1 1/2 tsp soy sauce
pinch of salt

To garnish:
Fresh spring onions or coriander

Method:

1. For the filling, dice the chicken thigh to 1cm pieces. Mix in a bowl with a dash of sake and soy sauce. Allow to marinate for 10 minutes.

2. Heat up a non stick pan and sear the chicken pieces. Dish and set aside. 

3. Halve the shrimps. Mix shrimps and crab sticks in a bowl with a dash of sake and soy sauce, set aside.

4. For the custard, beat the eggs (but not too hard to prevent too much bubbles). Place the water and dashi stock in a bowl and microwave for 30 seconds.

5. Mix the beaten eggs, dashi stock and remaining custard ingredients gently with a fork until well combined. 

6. Distribute the chicken, shrimp, crab stick and mushroom fillings evenly between 6 small bowls. Pour custard mixture into each bowl. 

7. Steam on lowest fire for approx. 12 minutes. Test by sticking chopsticks in the mixture. If soup comes out clear, it is done. Garnish with spring onions or coriander. 


Super smooth and delicious


Finally, my friend also brought this AMAZING sashimi platter from Suzuran. It was so fresh, delicious and even fatty too. Amazing quality and price. Need to have this again!

Suzuran on Urbanspoon